
I have 4 DVDs. How do I get those DVD into iMovie on my iMac with macOS Big Sur in the proper format? So many posts all over the internet on this and nothing seem to be definitive, current, or safe. THANK YOU!
DVD file is not supported by iMovie, to import DVD to iMovie, you need to convert DVD to iMovie friendly video format. Here we have 2 methods to help guys to convert and import DVD to iMovie for editing easily.
Method 1. Convert DVD to iMovie with Handbrake(Only for Homemade DVDs)
DVD has two major types:commercial DVDs and non-commercial DVDs. Homemade DVDs are one of the non-commercial DVDs. If you like to DIY homemade DVDs and are looking for a better way to import DVD into iMovie, you can try Handbrake–free DVD to iMovie Converter. Yes, Handbrake is totally free of charge yet powerful to free rip DVD to iMovie accepted MP4 M4V formats, and it is quite easy to operate. Read the following step-by-step tutorial guide carefully to learn how to import DVD into iMovie.

Step 1: Free download and install Handbrake before converting & importing DVD to iMovie.
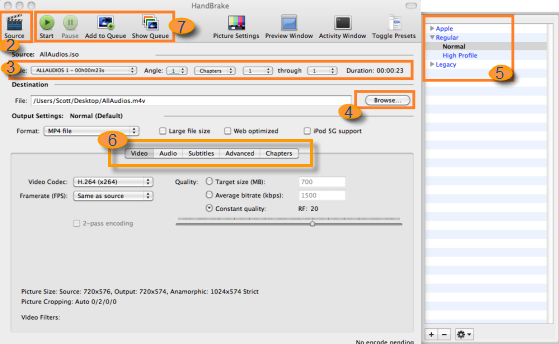
Step 2: Choose the source DVD you want to convert to iMovie (homemade DVD only).
Step 3: Choose a Title and Chapters.
Step 4: Select the destination folder for output DVD files storage.
Step 5: Adjust parameter settings if you need, including video codec, frame rate, bit rate, etc.
Step 6: Click “Start” button and this free DVD to iMovie converter will go into action to convert DVD to iMovie supported MP4 M4V formats.
After getting converted video file, open iMovie, choose file and select Import Movies to import converted video file to iMovie. Then, you can start video editing within iMovie upon your needs.
Drawbacks of HandBrake Converting DVD to iMovie on Mac:
● It does not allow converting protected and commercial DVDs.
● The interface is complicated to understand and use.
● A lot of users complain about compatibility issues while working with the application on Mac Mojave and other versions.
● The quality of the result MP4 video may be very poor compared to the original DVD quality.
● DVDs can be converted to a limited number of formats.
Method 2. Convert DVD to iMovie with Best DVD to iMovie Converter(Commercial DVDs included)
In addition to non-commercial DVDs(homemade DVDs), there are also commercial DVDs that are well protected by CSS protection, Sony ArccOS, CSS region protection, UOPs, APS, etc. Unlike homemade DVDs, Handbrake cannot be used to convert those commercial DVDs. We need to take advantage of some other DVD to iMovie converters in order to convert commercial DVDs and DumboFab DVD Ripper for Mac is one of the best choice.
With it, you can easily convert DVD and other disc formats (ISO, Video_TS etc.) to a format such as H.264, HEVC, Apple Intermediate Codec or Apple ProRes. These formats can be well compatible with iMovie. H.264 and HEVC can preserve image quality with the smallest file size. Apple Intermediate Codec and Apple ProRes preserve the best image quality and provides better performance when editing in iMovie, but creates much larger files that use more storage space than H.264 and HEVC files use.
When it turns to the DVD ripping ability, DumboFab DVD Ripper for Mac can handle both general home DVD discs/DVD Folders and the copy protected ones employing region code, CSS, Sony ARccOS, UOPs, APS and RCE. After successful accessing and loading, those DVDs with one or multiple titles can be ripped to mainstream digital formats like MP4 (H.264/MPEG4), MPEG, WMV, MOV and MP3, as well as prevailing devices like iPhone, Apple TV, Samsung, HTC etc..
How to convert DVD to iMovie supported video format
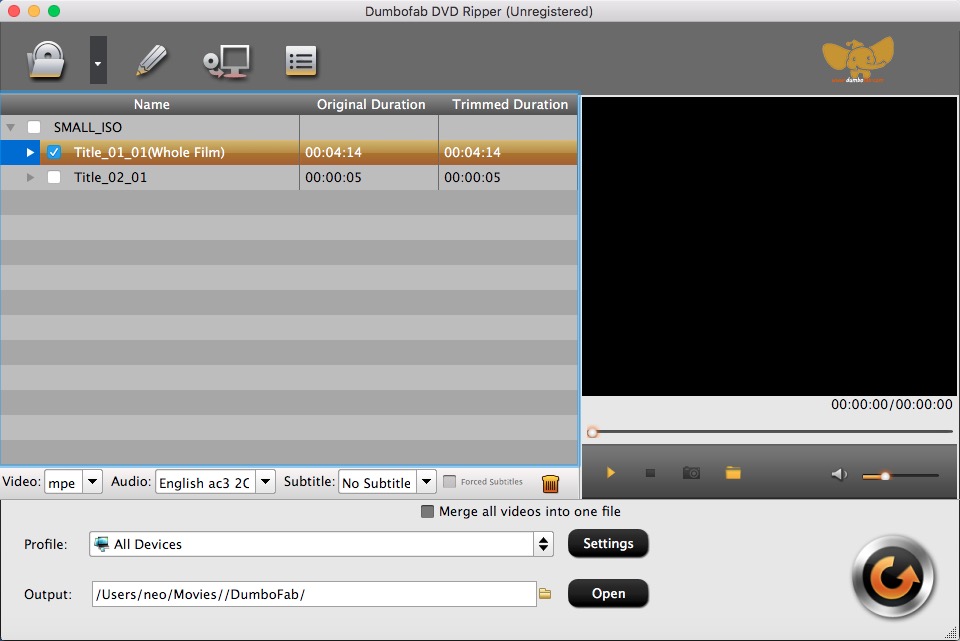
STEP 1. Load DVD movies
Insert the DVD disc into your Mac’s DVD drive and click Import DVD icon to load the DVD movies. Or simply drag the DVD disc icon on the desktop to the program. Loaded DVD movies can be previewed in the right preview window and you’re free to take snapshots of your favorite DVD movies. In addition, you can select the subtitle and audio track as you like.
STEP 2. Choose an iMovie Compatible Format.
The Profile tray locates in the buttom of the window. From Editing Software you can select iMovie (encoded with Apple Intermediate Codec) or an Apple ProRes as the output file. Both of the profiles can generate files with best image quality and better editing performance for iMovie.
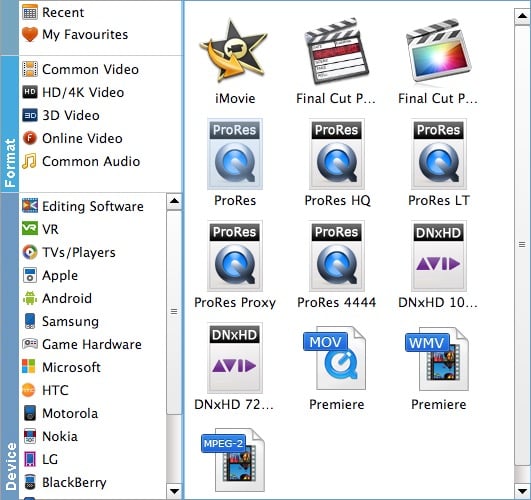
Tip: If you want to customize the profile, you can click settings to use the parameters you want.
STEP 3. Start conversion
When all the settings are fine, click the Convert button to start converting your DVD movies to optimized AIC .mov video files for iMovie. When then conversion completes, click the Open button to get the ripped video files. Launch iMovie and click File > Import > Movies to import the converted videos to iMovie for further editing. Just create your masterpiece with joy!