
I’ve been making videos and exporting them perfectly and uploading them to youtube. However, yesterday I go to export this video and I get this message. No idea what to do. Thought Premier pro and media encoder would need updating so I’ve updated them both to the most recent one, yet it still says it’s not installed.
When trying to export a sequence in Adobe Premiere Pro but frequently meet the “Adobe Media Encoder Not Installed” error? There can be two cases where you can experience this problem; one where you have the media encoder already installed and one where you don’t. In this article, we will address both the issues and how to fix them.
What causes the error message “Adobe Media Encoder is not Installed” when using Adobe Premiere Pro, Adobe After Effects, Photoshop and other Adobe products?
After our extensive research and experimentation, we came to the conclusion that there were several reasons why you might experience this issue computer to computer. Here are a few of them:
+ Media Encoder not Installed: This is the most common case where indeed the media encoder is not installed on your computer. You would have to download and install it before you can start using all the features of Adobe software.
+ Corrupt installation: This case was seen in numerous different scenarios. Installations can potentially get corrupt if they are moved from drive to drive or relocated.
+ Default location: Adobe Media Encoder should be present in the default location in order to be used properly by all the Adobe products.
+ Older version: If you have an older version of any of the applications, you might experience the error message. Make sure that the latest builds are installed on your computer.
Solutions to “Adobe Media Encoder Not Installed” Error in Premiere/AE
Before we proceed with the solution, make sure that you are logged in as an administrator on your computer. Furthermore, you should have an active and open internet connection. We are assuming that you have the correct subscription of Adobe Creative Cloud through which you use the applications.
Solution 1: Installing Adobe Media Encoder
The error message which you are experiencing is legit if you have indeed not installed Adobe Media Encoder on your computer. Some applications have made it necessary for the encoder to be present in your computer in order for full functionality. In this solution, we will navigate to the official website of Adobe systems and install the application after downloading it.
1. Navigate to the official Adobe Media Encoder website and download the executable to an accessible location.

You can also download the application directly from the Adobe Creative Cloud application. You can search for products there and install accordingly.
2. Right-click on the executable and select Run as administrator. After installing, restart your computer and check if the error message is resolved.
Solution 2: Changing the Preference of Install Location
Adobe applications are not designed to work properly if you change their install location manually by copy-pasting them. Registry files and preferences might break after you manually move the install location. Because of this, Adobe Media Encoder will, in reality, be installed on your computer but because of you changing the location manually, it will not be registered correctly in the system. In this solution, we will try to remedy this and make sure that the install location is correct.
1. First, try manually moving the applications back into the default directory which is:
C:\Program Files\Adobe
If after pasting the installation back to the default directory the error still persists, you have to follow the steps mentioned below.
2. Open Adobe Creative Cloud and uninstall all the applications which you have moved manually to some other location.
3. After installation, install the applications again from the Creative Cloud. Make sure that you change the preference of the install location correctly before proceeding.
Press the gear icon present at the top-right side of the application and select Preferences. Once in the preferences, check the Install location and select the default directory back again. Make sure that the directory is correct before proceeding.
4. Restart your computer after reinstalling/moving and check if the issue is resolved.
Solution 3: Update Adobe Media Encoder
You can update installed Adobe apps including Media Encoder automatically or manually. Here are the specific steps:
1. Keep Adobe Media Encoder updated automatically.
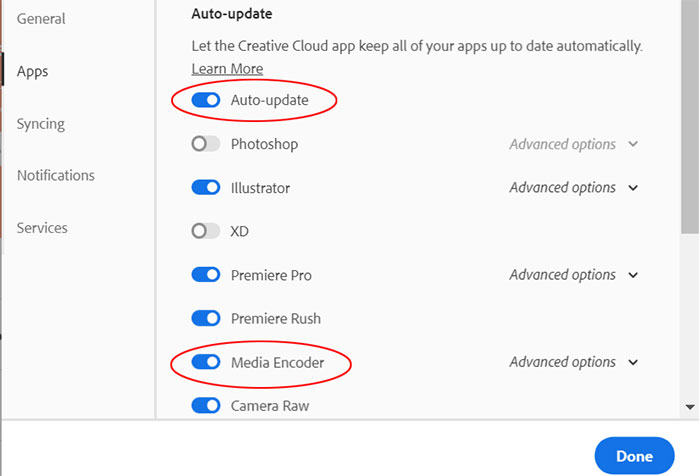
– Open the Creative Cloud desktop app. Select the Account icon and then select Preferences.
– Select the Apps tab and turn on the Auto-update for all apps of Adobe software. Or choose the specific app like Media Encoder and turn on the Auto-update.
– Click Done button when you’re finished.
2. Check the latest version of Media Encoder manually.
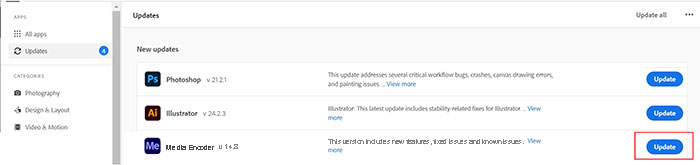
– Open the Creative Cloud desktop app as well.
– Select Updates in the left pane of the Apps tab.
– Select the … more icon, and then click on Check for updates.
– Find Media Encoder and click Update button to upgrade it to the latest version.
If you have upgraded Adobe Media Encoder to the latest version, Adobe Premiere Pro still won’t queue to Media Encoder. It might be an issue of the Premiere Pro. It requires the same version of both applications to queue the export. Thus you can update Premiere Pro to the latest version or install previous versions of Media Encoder.
Well, what If “Adobe Media Encoder Not Installed” Error Still Not Resolved?
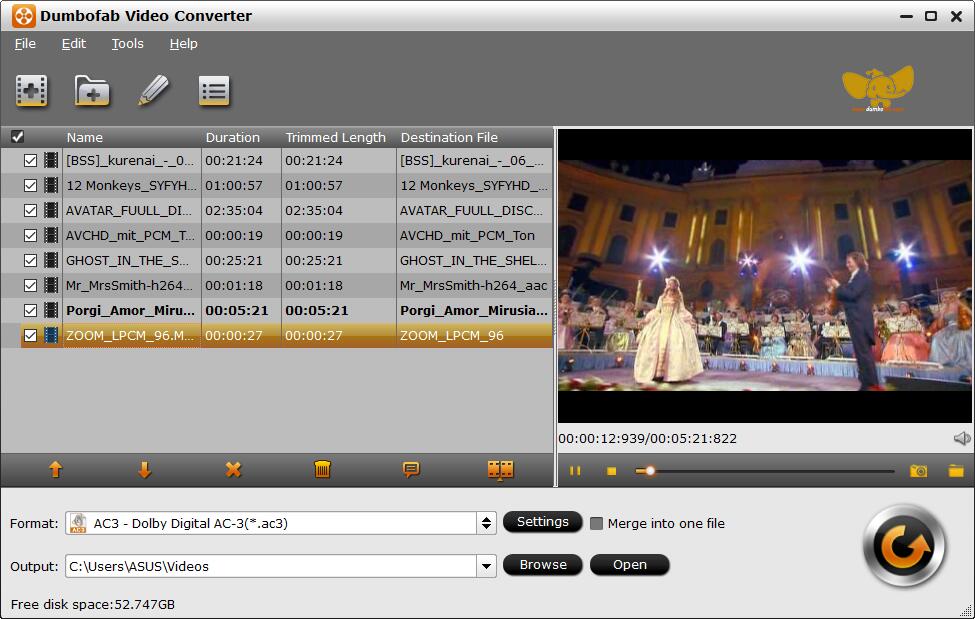
If Adobe Media Encoder is still not working to queue to export after the above tips, you may need to consider another alternative to export your media. DumboFab Video Converter will be a good choice for transcoding and exporting video files.
• Transcode and export videos to MP4, H.264, H.265, AVI, WMV, MOV, MPEG-2 and 300+ profiles without quality loss.
• Change video parameters like codec, bitrate, frame rate, etc. to fit different apps and screens.
• Reduce & Compress 4K/HD Video Size Without Quality Loss.
• Edit 4K/Full HD Videos Efficiently. No Experience Required!
• 30X real time faster to convert videos with the with NVIDIA® CUDA™ Intel® Core™ and AMD® acceleration technology.
Step 1. Load the source
Launch DumboFab Video Converter, and then drag and drop the source video into the main UI for loading, or navigate it through the Add buttons on the main UI.
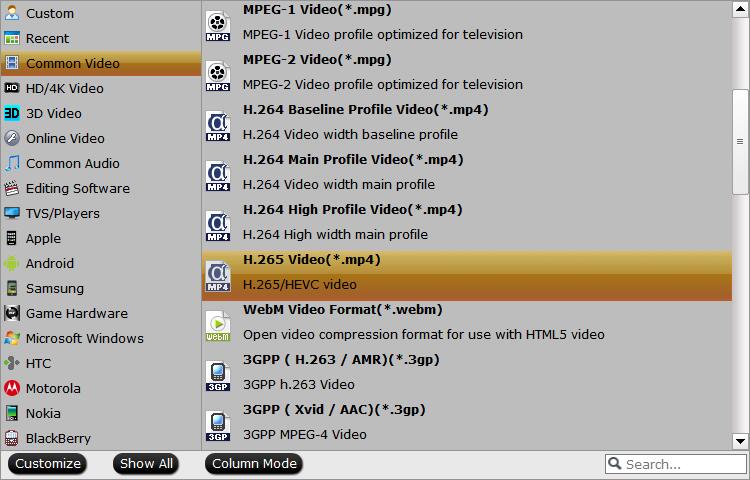
Step 2. Choose one profile
Clicking the “Format” bar, you can choose one format or device profile from the format list. If you have higher requests regarding the output video, you can set all the video and audio parameters in “Profile Settings” window, and deeply customize the output video effect with the built-in video editor.
Step 3. Start to convert videos
Click the “Convert” button, DumboFab Video Converter will immediately begin converting video to the target profile you have chosen, and provide you with the detailed progress details during the process. You can cancel the task anytime you don’t want to continue during the process, and you can also set your PC to automatically shut down when the task is done.