Why can’t I import .mov files into Premiere? I converted them to mp4 with VLC but they flash green in the preview and in the previous test export they were constantly skipping frames and jumping back and forth.
You might fail to import and edit MOV in Adobe Premiere Pro. In this article, we will share the possible solutions to works with MOV files in Premiere Pro CC without any issue.
Part 1. Possible Reasons Why Premiere Pro Not Import MOV Videos
According to Adobe official website, Premiere Pro natively supports MOV QuickTime format. That being the case, why does codec missing or unavailable error pop up when importing MOV to Premiere? Why it only shows audio no video when importing 4K MOV? Possible causes are:
1. Incompatible codecs. Adobe official website points out that not all QuickTime codecs are supported by default and that some codecs require third-party components.
2. Hardware configurations are too low to support 4K MOV footages, especially 4K MOV shot in high frame rate like 60FPS.
3. Media cache files in database.
4. MOV file is corrupted.
Though each potential reason might result in MOV not importing to Premiere issue, the major culprit is the incompatible codec. Thus, the most practical approach to fix Premiere not importing MOV problem is to convert MOV to ProRes encoded videos for Premiere.
Part 2. 100% Workable Solution to Fix “Can’t Import MOV to Premiere” Error
To do the MOV files and Adobe Premiere task, DumboFab Video Converter will give you a big hand. This video converter offers an optimized Adobe Premiere preset for easy access. With it, you can easily transcode MOV to ProRes, MPEG-2, which ensures maximum editing quality and efficiency when working with Premiere.
In terms of the compute-intensive 4K MOV files, it’s also a decent performer, letting you downscale 4K to 1080p, lower 60FPS to 30FPS, adjust bit rate, etc. to better suit your computer hardware configurations and to ensure a smooth MOV importing and latter editing. And it also provides optimal codecs for iMovie, Final Cut Pro, Sony Vegas, etc.
3 simple steps to do the MOV to Premiere Pro conversion
Step 1. Open DumboFab Video Converter, you can directly drag and drop source HEVC files, or click Add Video button on the toolbar to load HEVC files.

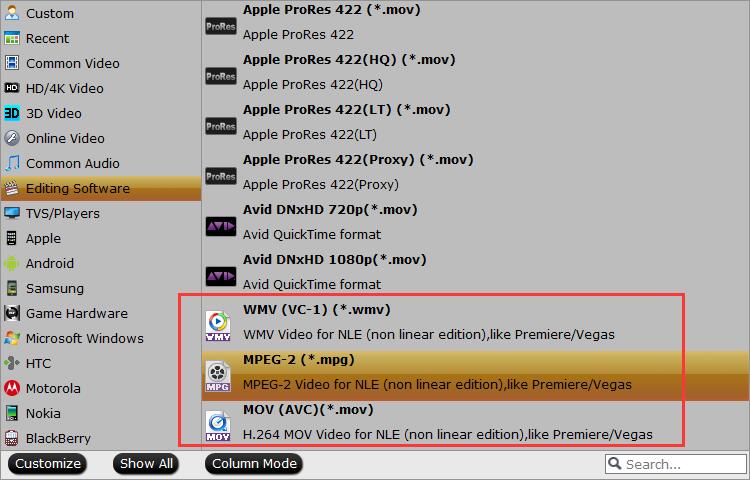
Step 2. Click Format pull down list to select MPEG-2(.mpg) from Editing Software category as the best video format for Adobe Premiere Pro CC/CS6/CS5. Apple ProRes is also a good choice.

Step 3. Hit Convert button in the lower right corner and the conversion will begin in no time. Once done, Adobe Premiere Pro should be able to import the converted MOV footage without any trouble.
Part 3. More Solutions You Can Try to Resolve Premiere Not Importing MOV Issue
Option 1: Upgrade Premiere Pro or Hardware Configurations
To add 4K MOV to Premiere Pro, upgrade your Premiere Pro to Premiere Pro CC latest version. Yet, MOV video editing in 4K resolution is a hardware intensive task. You’re required to improve your hardware configurations (incl. RAM, GPU, CPU) to a higher level if lagging issue is what you want to avoid.
Option 2: Install QuickTime Player
Adobe Premiere Pro CS4 users attention: please download and install QuickTime player, restart your Premiere Pro CS4 and you can simply import MOV footages into Premiere Pro.
The small nit is that editing MOV H264 video in Premiere Pro CS4 will lead to choppy playback and freezing issues.
Option 3: Download and Install Media Feature Pack
For those who have installed Windows 10 Pro N edition, please install the newest version of media feature pack to fix Premiere Pro CC not importing MOV problem. This method is verified to be valid by community.adobe users.